
They appear to be totally custom since they're sealed to the body with silicone. The housing inside the trunk doesn't have any light bulb sockets; the wires go straight through the housing. Hopefully they're LED so I don't have to worry about changing bulbs. If I can't find a way to add more LEDs to make them brighter I'll have to swap them out for safety reasons. Unfortunately, the rear panel was hacked up to make room for the lights so I may not find a bolt-on replacement.
Maybe something like this:

Whoops, wrong pic. More like this:

These are '65 Thunderbird lenses which were also reused later on the '68 Shelby and California Special Mustangs. My lenses look to be way bigger than the cutout so these may work. Future project...
UPDATE:
I just found the lenses on the National Parts Depot website.
Apparently they replace the stock lens without any modification. I guess only the outer third would light up.
I also found a part number on the housings, SF-3670442 & SF-3670443. Apparently these are for a 1974 AMC Matador; the internal electronics and LEDs are obviously not.
UPDATE 2:
I finally took the plunge and decided to tackle removing the tail light housings inside the trunk. They were attached to the body with what looked like hot glue and silicone but could have been an epoxy. I used a utility blade to slice between the housing and the body until I could gently pry it off.


If you look close you can see the panel is made by ClassicLEDs LLC. Unfortunately, it doesn't look like I can modify this to make it brighter.
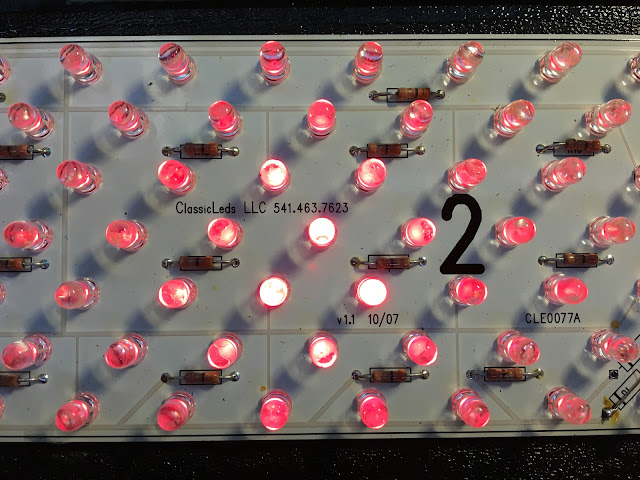
Here's a picture with just the parking lights on. I couldn't take a picture of the brake lights since I'm not quick enough but they are much brighter. Since this panel is not a one of a kind and I haven't found any other complaints about them being too dim I've decided to go ahead and keep them and just replace the tail light lenses. There are several vendors selling a kit to fit the '68 Shelby lights to a '65 or '66. All of these kits appear to use this same LED panel, although mine is only version 1.1 lol.

Here's a shot from the inside of the trunk looking through the lenses that are siliconed to the body. You can see how the chrome strips on the outside block around 33% of the light passing through. Plus the chrome strips can cause a glare which makes the LEDs seem that much dimmer. So hopefully swapping these lenses for the Shelby tail lights will help the LEDs put out more light. I'm pretty sure I'll end up with some screw holes in the back panel that won't be covered by the new tail lights. We'll see how it goes.
UPDATE 3:
After much debate I finally ordered new tail lights from Mustang Depot. The kit came with lenses, chrome trim, tail lamp housings, gaskets, and hardware.

I don't actually need the housings that mount in the trunk, but my AMC housings look out of place. Once the parts arrived I worked on removing the old tail lights.

Removing the old lenses wasn't as hard as I thought it would be. They were mounted to the rear panel with 4 screws, some double-sided tape, and what appeared to be urethane caulk. I just took my time slicing around the edge with a utility blade and then slowly pried the lens away.

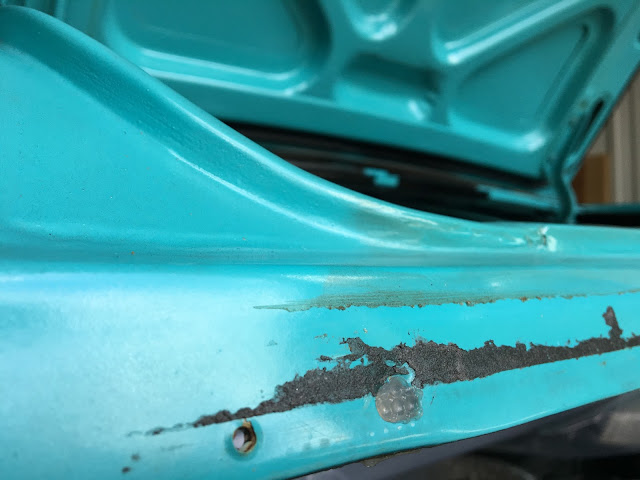
On the back of the old lens you can see some rust on the metal tabs that hold the trim strips on. The strips appear to be stainless steel but the manufacturer skimped out on the mounting tabs. With the way the lens was sealed to the body, there wasn't any way for moisture to get behind the panel except through the holes for the trim, and through the mounting screw hole in the upper left. I'm actually surprised to find any rust here, but just a simple car wash would allow moisture to get trapped behind the lens. Whoever installed these lights also mounted a piece of clear plexiglass on the inside of the cutout hole that you can see in the next photo. I'm guessing this was to keep water out of the trunk.

Here's what the new tail light trim looks like in place. While it doesn't cover the 2 holes on the left (from the housing mounting screws), what you can't see is the 1/4" gap on the right. The cutout in the body is just slightly bigger than the new lens. This gap is beyond my bondo skills, and replacing the rear panel with new sheet metal is a major job. I thought about covering the entire rear with a 6" with piece of brushed aluminum and cutting new holes, but ultimately decided to go with a fiberglass panel that mimics the panel that Shelby used in 1968.

This new panel will still require lots of prep and paint, but I'll be able to take it somewhere, have it painted professionally, and then mount it myself. It attaches with just a few screws across the top, which will be hidden under the trunk lid, and along the bottom behind the bumper. The lights themselves will also help secure the panel in place.
Besides solving my problem, this panel serves another purpose. The '65 Thunderbird chrome trim piece only covers the rearward facing surface of the lens, which is around 1/2" thick. When mounted on a flat surface, like my Mustang, this portion of the lens between the body and the trim is exposed. On the T-Bird the lens was surrounded by other trim pieces so the edges of the lens couldn't be seen. Shelbys and California Specials utilized this molded panel to make the lens appear recessed while hiding the exposed edges.
While waiting for my tail light panel to arrive I took the time to clean up the rear of the car. When my car was last painted around 10 years ago, they buffed out the paint and left white compound in all kinds of seams and panel edges. After 10 years that compound is rock hard and almost impossible to remove. Almost. I tried water, Simple Green, quick detailer, and cleaner wax, but nothing touched it. Until I tried rubbing alcohol. Simply amazing! The dried up compound wipes right off. So as I was cleaning up around the trunk area I found that the rubbing alcohol removed more than the compound.

There are more than a few spots on my car where the paint looks dirty but won't come clean. I've tried polishing the spots but they wouldn't go away leading me to think it was overspray from the strips. However, the amazing rubbing alcohol even removed the dirty haze.
The black tape is leftover sticky stuff from the old lights, but you can see how the shiny, dirty haze came off around the trunk opening.
The new tail light finally came in and when I held it in place I got an idea of the trimming that would be required.

I used a paper template to transfer markings where I needed to cut the panel, then used a cut-off wheel on my die grinder.

Of course, there was a lot of trimming required. I made sure to remove small bits at a time.

I even had to trim about 3/8" all the way across the top edge in order to make the fiberglass sit flat on the sheet metal.

When I got the panel fitting as well as I could I discovered the trunk lid wouldn't close all the way. As a compromise I had to raise the latch about 1/4".

Here's what it looks like with everything in place but the rear bumper. The trunk isn't latched in this picture so it looks way off.

For now I decided to spray the panel with satin black trim paint. I can always repaint it later.

UPDATE 2:
I finally took the plunge and decided to tackle removing the tail light housings inside the trunk. They were attached to the body with what looked like hot glue and silicone but could have been an epoxy. I used a utility blade to slice between the housing and the body until I could gently pry it off.

Here's a shot of the LED panel attached to the inside of the housing.

If you look close you can see the panel is made by ClassicLEDs LLC. Unfortunately, it doesn't look like I can modify this to make it brighter.

Here's a picture with just the parking lights on. I couldn't take a picture of the brake lights since I'm not quick enough but they are much brighter. Since this panel is not a one of a kind and I haven't found any other complaints about them being too dim I've decided to go ahead and keep them and just replace the tail light lenses. There are several vendors selling a kit to fit the '68 Shelby lights to a '65 or '66. All of these kits appear to use this same LED panel, although mine is only version 1.1 lol.

Here's a shot from the inside of the trunk looking through the lenses that are siliconed to the body. You can see how the chrome strips on the outside block around 33% of the light passing through. Plus the chrome strips can cause a glare which makes the LEDs seem that much dimmer. So hopefully swapping these lenses for the Shelby tail lights will help the LEDs put out more light. I'm pretty sure I'll end up with some screw holes in the back panel that won't be covered by the new tail lights. We'll see how it goes.
UPDATE 3:
After much debate I finally ordered new tail lights from Mustang Depot. The kit came with lenses, chrome trim, tail lamp housings, gaskets, and hardware.

I don't actually need the housings that mount in the trunk, but my AMC housings look out of place. Once the parts arrived I worked on removing the old tail lights.

Removing the old lenses wasn't as hard as I thought it would be. They were mounted to the rear panel with 4 screws, some double-sided tape, and what appeared to be urethane caulk. I just took my time slicing around the edge with a utility blade and then slowly pried the lens away.

On the back of the old lens you can see some rust on the metal tabs that hold the trim strips on. The strips appear to be stainless steel but the manufacturer skimped out on the mounting tabs. With the way the lens was sealed to the body, there wasn't any way for moisture to get behind the panel except through the holes for the trim, and through the mounting screw hole in the upper left. I'm actually surprised to find any rust here, but just a simple car wash would allow moisture to get trapped behind the lens. Whoever installed these lights also mounted a piece of clear plexiglass on the inside of the cutout hole that you can see in the next photo. I'm guessing this was to keep water out of the trunk.

Here's what the new tail light trim looks like in place. While it doesn't cover the 2 holes on the left (from the housing mounting screws), what you can't see is the 1/4" gap on the right. The cutout in the body is just slightly bigger than the new lens. This gap is beyond my bondo skills, and replacing the rear panel with new sheet metal is a major job. I thought about covering the entire rear with a 6" with piece of brushed aluminum and cutting new holes, but ultimately decided to go with a fiberglass panel that mimics the panel that Shelby used in 1968.

This new panel will still require lots of prep and paint, but I'll be able to take it somewhere, have it painted professionally, and then mount it myself. It attaches with just a few screws across the top, which will be hidden under the trunk lid, and along the bottom behind the bumper. The lights themselves will also help secure the panel in place.
Besides solving my problem, this panel serves another purpose. The '65 Thunderbird chrome trim piece only covers the rearward facing surface of the lens, which is around 1/2" thick. When mounted on a flat surface, like my Mustang, this portion of the lens between the body and the trim is exposed. On the T-Bird the lens was surrounded by other trim pieces so the edges of the lens couldn't be seen. Shelbys and California Specials utilized this molded panel to make the lens appear recessed while hiding the exposed edges.
While waiting for my tail light panel to arrive I took the time to clean up the rear of the car. When my car was last painted around 10 years ago, they buffed out the paint and left white compound in all kinds of seams and panel edges. After 10 years that compound is rock hard and almost impossible to remove. Almost. I tried water, Simple Green, quick detailer, and cleaner wax, but nothing touched it. Until I tried rubbing alcohol. Simply amazing! The dried up compound wipes right off. So as I was cleaning up around the trunk area I found that the rubbing alcohol removed more than the compound.

There are more than a few spots on my car where the paint looks dirty but won't come clean. I've tried polishing the spots but they wouldn't go away leading me to think it was overspray from the strips. However, the amazing rubbing alcohol even removed the dirty haze.

The black tape is leftover sticky stuff from the old lights, but you can see how the shiny, dirty haze came off around the trunk opening.
The new tail light finally came in and when I held it in place I got an idea of the trimming that would be required.

I used a paper template to transfer markings where I needed to cut the panel, then used a cut-off wheel on my die grinder.

Of course, there was a lot of trimming required. I made sure to remove small bits at a time.

I even had to trim about 3/8" all the way across the top edge in order to make the fiberglass sit flat on the sheet metal.

When I got the panel fitting as well as I could I discovered the trunk lid wouldn't close all the way. As a compromise I had to raise the latch about 1/4".

Here's what it looks like with everything in place but the rear bumper. The trunk isn't latched in this picture so it looks way off.

